Kubernetes 實作紀錄(上)- Web Application Settings
今天決定來寫上學期必修課的期末報告!雖然說這堂課過得非常莫名其妙,期末專案也只有一(?)個條件,不過在建完整個專案之後還是學到蠻多東西的。至於老師提出的唯一一個條件則是要我們理解微服務到底在幹嘛,並且一定要用到 Kubernetes;在與組員討論過後,我們決定做個最簡單的論壇網站(可以註冊、登入、發文、留言),前端使用 React.js,後端使用 Django 作為 API server,用 Docker 把這兩個服務打包後,再來煩惱要怎麼用 K8s 或 Docker-compose 對這些服務做管理。
本專案的前端由 React.js (v17) 建置,部分元件因為與之前寫的專案通用,所以用的是原始的 class based,另一部分因為被畢業專題組員推坑,使用的是 functional component 的寫法。
Basic Settings - Routing
在整個前端開發的過程中,我遇到比較麻煩的地方有 Routing 的設置。因為這次專案並沒有很大,所以我把 routing 的規則直接寫在 App.js 裡,使用的是 react-router-dom 的套件。基本上會用到 BrowserRouter、Routes、Route 三個物件,BrowserRouter 用於處理動態內容的路徑宣告(靜態則使用 HashRouter),Routes 則為 v5 的 Switch 在 v6 的對應,也就是控制 url 與 path 的 mapping,最後 Route 的部分就是單純的路徑宣告,與該路徑對應到的元件。
import { BrowserRouter, Route, Routes } from "react-router-dom";

function App() {
  return (
    <>
      <Nav/>
      <div className='container py-5'>
        <BrowserRouter>
          <Routes>
              <Route index element={<PostContainer/>}/>
              <Route path="post/:postId" element={<Post />}/>
              <Route path="profile" element={<Profile />}/>
              <Route path="login" element={<Login />}/>
              <Route path="signup" element={<Signup />}/>
          </Routes>
        </BrowserRouter>
      </div>
    </>
  );
}
Dockerfile
至於容器化的部分就真的很簡單,只需要使用正確版本的 node base image(我們用的是 node:14-alpine),接下來只要確認所有東西都有複製到容器裡,然後安裝所有套件,就可以把前端的 server 開起來了。
FROM node:14-alpine
WORKDIR /forum
COPY package.json .
RUN yarn install
COPY . .
RUN npm run build
EXPOSE 3000
CMD ["yarn", "start"]
這邊沒使用 Volume 是因為還沒學到…😀🔪
後端因為是全部交給另一個組員處理,所以我能紀錄的東西也不多 QQ
Docker-compose
檔案結構
在我們建置完前後端的容器後,直接在兩個專案的外面再新增一個 docker-compose 的 yaml 檔。不過因為需要 nginx 來反向代理 React 的 Node.js web server,所以需要新增一支 nginx-setup.conf 的設定檔;而後端採用 uWSGI 作為 WSGI 伺服器,因此才會有 uwsgi.ini 這個檔案。
▾ forum/  # front-end
  ▸ public/
  ▸ src/
    Dockerfile
    package.json
    yarn-error.log
    yarn.lock
▾ forumserver/  # back-end
  ▸ forum/
    Dockerfile
    requirements.txt
    start_server.sh
    uwsgi.ini
▾ nginx/
    nginx-setup.conf
  docker-compose.yml
WSGI & Nginx
在第一次接觸到 Python web app 時,就有聽說過 WSGI 這個東西,至於 Nginx 則是連實習也都會用到的工具,在這邊先簡單介紹一下這兩個工具的用途:
- WSGI: Python Web Server GateWay Interface,Python 對於 Web Server 與 Web Application 之間溝通的規範。
- Nginx: 可以提高 Web server 效能,對於靜態檔案有 Cache 的機制,降低 response 的等待時間,同時有均衡附載的特性,也可以作為反向代理伺服器
在採用了上述兩個工具後,專案的 request 傳遞架構會跟下圖一樣:
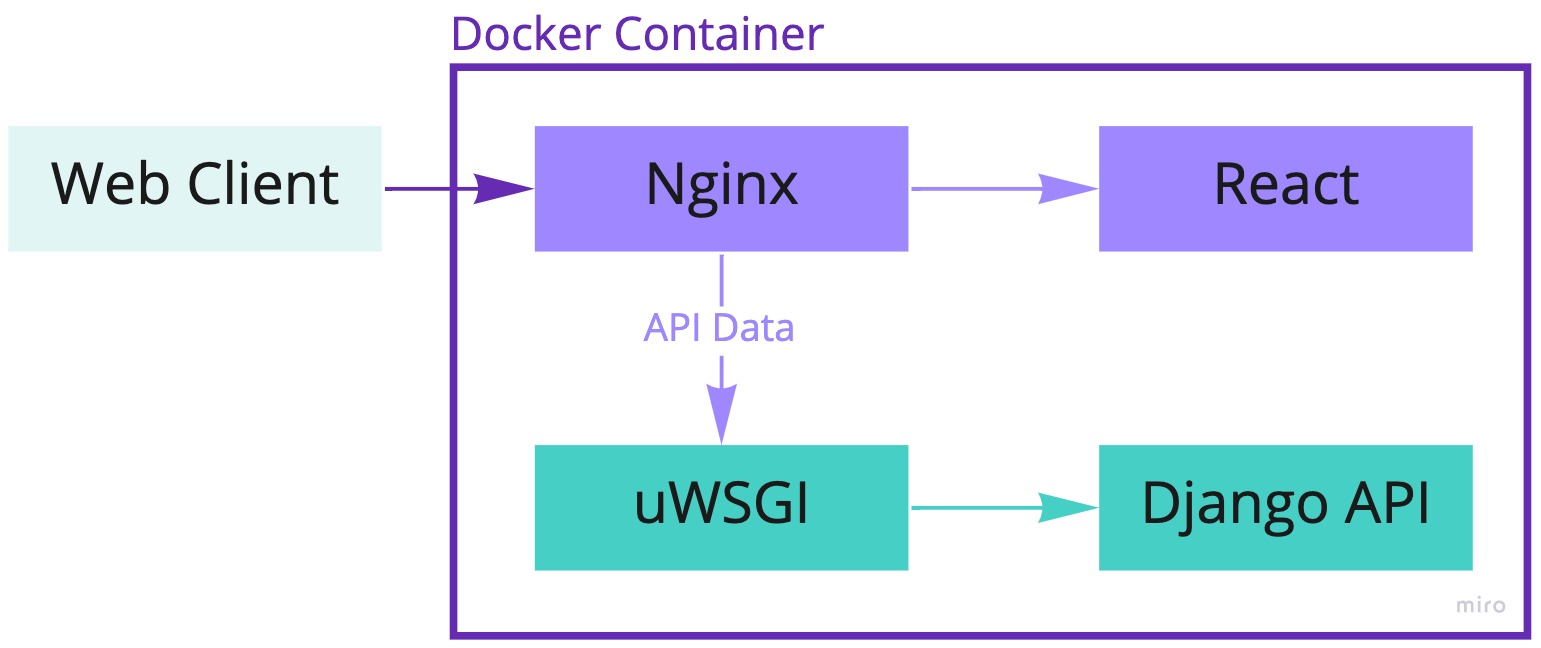
因為 Nginx server 無法實現 WSGI 規範,因此我們採用了 uWSGI,是一種實現了 WSGI 等規範的 server(另外一種也很常見的 WSGI server 為 Gunicorn),用於接收前端(代理)伺服器轉發的動態請求,轉發給 Web application(Django),並接收回傳的結果、轉發給代理伺服器(Nginx)。
為了能順利使用 Nginx 與 uWSGI server 做溝通,我們需要加上 Nginx 的設定檔,基本上就是設定要聽哪個 port 來的 request,還有 API server 的位置,並且設定靜態檔案的路徑。其中 try_files 那行的意義是,當遇到無法解析的路徑時,全部都導向 index.html,這麼做就會達到讀取 React app 的效果。
upstream api {
    server backend:8000;
}

server {
  listen 8080;

  location / {
    root /var/www/forum;
    try_files $uri $uri/ /index.html =404;
  }

  location /api/ {
    proxy_pass http://api;
    proxy_set_header Host $http_host;
  }
}
docker-compose.yml
最後因為我們加上了 Nginx,因此會需要在 docker-compose.yml 裡新增一項 Nginx 的服務;所以最後總共會有前後端與 Nginx 三個服務,設置如下:
version: '3'

services:
  backend:
    build:
      context: ./forumserver
    command: /bin/sh /opt/uwsgi/start_server.sh
    ports:
      - "8000:8000"
  frontend:
    build:
      context: ./forum
    volumes:
      - react_build:/forum/build
    command: yarn start
  nginx:
    image: nginx:latest
    ports:
      - 80:8080
    volumes:
      - ./nginx/nginx-setup.conf:/etc/nginx/conf.d/default.conf:ro
      - react_build:/var/www/forum
    depends_on:
      - backend
      - frontend
volumes:
  react_build: